Recent rain showers have led to some beautiful green lawns in our area, and our crew are busy! But, as you may know soon the dry summer months will be upon us and your lawn will begin to dull and dry out. If not properly cared for you could end up with a drab yellow, or patchy, lawn.
So here are a few simple tips to keep your lawn healthy this summer.
1. Don't continue to mow your lawn once the dry months arrive. Once the dry months of summer arrive, your grass will stop growing, and regular mowing is unnecessary.
2. Toward the end of the Spring rainy season cut you grass to a height no lower than 3 inches. Cutting shorter than 3 inches will promote dryness, when the drought season is in full effect.
3. To help your lawn survive dry conditions and stay healthy all season, raise your lawn mower to its highest setting and leaving the cuttings on the lawn. The clippings also help shade the soil so it doesn’t dry out and compact this will also provide 50 percent of the nutrients your grass needs.
4. Also, keep mower blades sharp. Dull blades leave ragged cuts; moisture leaks out, disease enters, and grass turns brown.
5. You can allow your grass to go dormant which is a natural way to manage your lawn, this will create some browning of your grass. Or, you can choose to water the lawn to maintain the green.
6. If choosing to water your lawn, water it deeply at least 1 inch deep or run your sprinklers for at least 1 hour in the early morning or late evening when the sun is not high in the sky. Watering in the middle of the day can cause your grass to burn and die.
Follow these tips and your grass will thank you for it. Not sure you want to spend the time maintaining a lawn year round consider new landscaping. A new trend in the landscape industry is sustainable landscaping, a lawn free alternative, requiring little to no maintenance using drought resistant plants and stone accents.
Enjoy your summer! And, call us anytime for a FREE lawn care consultation (517)945-1204!
Showing posts with label gardening tips. Show all posts
Wednesday, June 19, 2013
Monday, April 1, 2013
Outdoor Planting
It's time! That's right it's finally time to get out there and clean out those garden beds and start planting! I know it seems a bit too cold but I promise there are a few hearty seeds that love to get started now. Here is a short list of what you can plant now and how to get the best results!
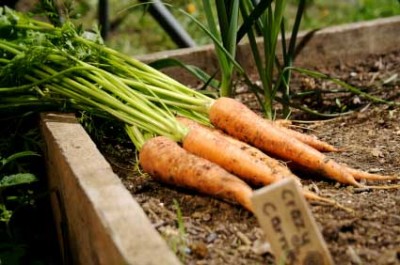
1.) Carrots. Carrots should be planted outdoors 3-5 weeks prior to the last Spring frost. Here are a few more tips for great carrots.
2.) Lettuce. Lettuce is a wonderful cool season crop. Planting to late in the season can cause early wilting, and low yields. Direct sowing is recommended as soon as the ground is able to be worked. By sowing early you can get a spring crop, and then replant in early fall for a second late season harvest. Here are few more tips for growing great lettuce.
For more planting dates and information visit:
http://www.almanac.com/gardening/planting-dates/MI/Jackson
Let's get gardening! Greener Solutions Lawn And Landscape can help install a raised garden bed for your vegetables at a great price, give us a call for FREE estimates!
Andy and Courtney Bailey
Greener Solutions Lawn And Landscape
517-945-1204
1.) Carrots. Carrots should be planted outdoors 3-5 weeks prior to the last Spring frost. Here are a few more tips for great carrots.
- Make sure your soil is free of stones; carrots need deeply tilled soil that they can push through.
- Have you ever seen a carrot that has grown “legs” or forked? Fresh manure, or even recently applied rotted manure, can cause carrots to fork and send out little side roots. Don’t use it before you plant your seeds.
- Plant seeds 3-4 inches apart in rows. Rows should be at least a foot apart.
- Gently mulch to retain moisture, speed germination and block the sun from the roots.
- Soil should be well drained and loose to prevent forking and stunting of the root growth.
- Once plants are an inch tall, thin so they stand 3 inches apart. Snip them with scissors instead of pulling them out to prevent damage to the roots of remaining plants.
- Water at least one inch per week.
- Weed diligently.
- Fertilize 5-6 weeks after sowing.
- Carrots taste much better after a couple of frosts. Following the first hard frost in the fall, cover carrot rows with an 18-inch layer of shredded leaves to preserve them for harvesting later
2.) Lettuce. Lettuce is a wonderful cool season crop. Planting to late in the season can cause early wilting, and low yields. Direct sowing is recommended as soon as the ground is able to be worked. By sowing early you can get a spring crop, and then replant in early fall for a second late season harvest. Here are few more tips for growing great lettuce.
- Leaf lettuce: Plant 4 inches apart.
- Cos and loose-headed types: Plant 8 inches apart.
- Firm-headed types: Plant 16 inches apart.
- Water thoroughly at time of planting.
- Fertilize 3 weeks after transplanting.
- Direct sowing is recommended as soon as the ground can be worked. Plant seeds ½ inch deep. Snow won’t hurt them, but a desiccating cold wind will.
- You should be able to sow additional seeds every two weeks.
- To plant a fall crop, create cool soil in August by moistening the ground and covering it with a bale of straw. A week later, the soil under the bale will be about 10 degrees F (6 degrees C) cooler than the rest of the garden. Sow a three foot row of lettuce seeds every couple of weeks—just rotate the straw bale around the garden.
- Consider planting rows of chives or garlic between your lettuce to control aphids. They act as "barrier plants" for the lettuce.
- Make sure soil remains moist but is well-drained.
- Retain moisture with mulch throughout the summer months.
- Lettuce will tell you when it needs water. Just look at it. If the leaves are wilting, sprinkle them anytime—even in the heat of the day—to cool them off and slow down the transpiration rate.
- Some thinning may be required for directly sown seedlings; use the space guidelines above.
- Weed by hand if necessary, but be careful of plant roots: They are shallow.
For more planting dates and information visit:
http://www.almanac.com/gardening/planting-dates/MI/Jackson
Let's get gardening! Greener Solutions Lawn And Landscape can help install a raised garden bed for your vegetables at a great price, give us a call for FREE estimates!
Andy and Courtney Bailey
Greener Solutions Lawn And Landscape
517-945-1204
Tuesday, March 26, 2013
More Spring Preparation
We wanted to take a moment to share with you one of the Spring promotions from Greener Solutions Lawn And Landscape, to help you with your outdoor landscape this season.
First, I know many of you have read and are following out blog for early indoor vegetable planting. Thank you for your interest! Greener Solutions is offering a special this Spring on raised garden beds to further help you get your garden growing this year!
There are many great reasons to use a raised garden bed. Raised beds offer a clean slate, guaranteed not to allow your plants to take over your yard or other garden areas, raised garden beds keep plants contained. Raised garden beds also offer you an opportunity to start with the very best soil. Clean soil with the proper pH will ensure healthier plants, and higher yields. They are also quite decorative, and can be a nice addition to your outdoor landscape. Plant, vegetables, herbs, or flowers, the possibilities are endless!
This season we can build and install your new raised garden bed, including top soil at a great price. All you have to do is put in the plants! We offer a wide variety of exterior building materials including, treated lumber, stone, or vinyl, and can build your raised garden to the size and height of your choice. Call us anytime to schedule your free consultation for raised garden bed installation. 517-945-1204
Prices include, preparing the area by leveling the ground, building the exterior wall structure with the materials of your choice, installation of garden underlayment for weed control, and new fresh top soil fully installed! This is a fully customizable service, so call anytime for a FREE consultation.
Continue to follow our blog for more information about our company and services! Thank you
Andy and Courtney Bailey
Greener Solutions Lawn And Landscape
517-945-1204
First, I know many of you have read and are following out blog for early indoor vegetable planting. Thank you for your interest! Greener Solutions is offering a special this Spring on raised garden beds to further help you get your garden growing this year!
There are many great reasons to use a raised garden bed. Raised beds offer a clean slate, guaranteed not to allow your plants to take over your yard or other garden areas, raised garden beds keep plants contained. Raised garden beds also offer you an opportunity to start with the very best soil. Clean soil with the proper pH will ensure healthier plants, and higher yields. They are also quite decorative, and can be a nice addition to your outdoor landscape. Plant, vegetables, herbs, or flowers, the possibilities are endless!
This season we can build and install your new raised garden bed, including top soil at a great price. All you have to do is put in the plants! We offer a wide variety of exterior building materials including, treated lumber, stone, or vinyl, and can build your raised garden to the size and height of your choice. Call us anytime to schedule your free consultation for raised garden bed installation. 517-945-1204
Prices include, preparing the area by leveling the ground, building the exterior wall structure with the materials of your choice, installation of garden underlayment for weed control, and new fresh top soil fully installed! This is a fully customizable service, so call anytime for a FREE consultation.
Continue to follow our blog for more information about our company and services! Thank you
Andy and Courtney Bailey
Greener Solutions Lawn And Landscape
517-945-1204
Labels:
business,
Free estimates,
gardening,
gardening tips,
landscape,
organic gardening,
preparedness,
quality,
raised beds,
raised garden,
raised garden beds,
spring,
tomato gardening,
vegetable garden
Sunday, March 17, 2013
More Help With Those Tricky Tomatoes
In an earlier post we discussed starting tomato plants from seeds, and the need to use tomato cages when transplanting to an outdoor garden bed. I have just a few more tips to grow the healthiest tomato plants possible, and ultimately get more fruit out of your plants!
First, before the first shoots appear, keep your seed starters in a warm place and keep soil moist until germination takes place. Once the first shoots appear, move into direct sunlight and continue to keep soil nice and moist.
Tomato plants can have weak stems if you don't condition them for outdoor conditions. The best way to do this indoors is to turn a fan on to the plants for 10-15minutes per day. The swaying of the plants in the breeze helps to strengthen the stems. Once true leaves appear, you can use the palm of your hand to gently brush across the tops once or twice a day to further encourage strong stem growth.
Also once true leaves form on the plant, begin to add soil in the pot, up to the bottom of the true leaves. Tomatoes can develop roots from their stems, so adding more soil will encourage new roots to form. The development of a strong root system, ultimately leads to a healthier plant, and more fruit. Further this concept at the time of transplantation into the outdoor garden bed by trimming off the bottom leaves from stems 6inches in height or more, and bury the plant up to the remaining height of the leaves.
If young plants begin to bud before it is time to transplant outdoors, then simply pinch off the buds. Budding too early can stress young plants. Also watch for the development of suckers in the crotch of the plant. These are tiny leaves that form where the branches of the plant split. These leaves have no real purpose and drain nutrients from other parts of the plant. You can simply pinch these off as well. Remeber to remove any dead or dried leaves on the lower portions of the plant too over the course of the season.
There are many varieties of tomatoes that you can choose from too. Think carefully about how you would like to use the fruit once harvested. For example, beef steak tomatoes are great for slicing and are usually very juicy. Whereas the pompeii variety is a great tomato for use in sauces, and salsas. And cherry tomatoes are a wonderful addition to salad. A little research in advance can help you decide which type will work best for you! Happy gardening!
Andy and Courtney Bailey
Greener Solutions Lawn And Landscape
www.greenersolutionslawn.com
517-945-1204
First, before the first shoots appear, keep your seed starters in a warm place and keep soil moist until germination takes place. Once the first shoots appear, move into direct sunlight and continue to keep soil nice and moist.
Tomato plants can have weak stems if you don't condition them for outdoor conditions. The best way to do this indoors is to turn a fan on to the plants for 10-15minutes per day. The swaying of the plants in the breeze helps to strengthen the stems. Once true leaves appear, you can use the palm of your hand to gently brush across the tops once or twice a day to further encourage strong stem growth.
Also once true leaves form on the plant, begin to add soil in the pot, up to the bottom of the true leaves. Tomatoes can develop roots from their stems, so adding more soil will encourage new roots to form. The development of a strong root system, ultimately leads to a healthier plant, and more fruit. Further this concept at the time of transplantation into the outdoor garden bed by trimming off the bottom leaves from stems 6inches in height or more, and bury the plant up to the remaining height of the leaves.
If young plants begin to bud before it is time to transplant outdoors, then simply pinch off the buds. Budding too early can stress young plants. Also watch for the development of suckers in the crotch of the plant. These are tiny leaves that form where the branches of the plant split. These leaves have no real purpose and drain nutrients from other parts of the plant. You can simply pinch these off as well. Remeber to remove any dead or dried leaves on the lower portions of the plant too over the course of the season.
There are many varieties of tomatoes that you can choose from too. Think carefully about how you would like to use the fruit once harvested. For example, beef steak tomatoes are great for slicing and are usually very juicy. Whereas the pompeii variety is a great tomato for use in sauces, and salsas. And cherry tomatoes are a wonderful addition to salad. A little research in advance can help you decide which type will work best for you! Happy gardening!
Andy and Courtney Bailey
Greener Solutions Lawn And Landscape
www.greenersolutionslawn.com
517-945-1204
Thursday, March 14, 2013
The Benefits Of Attending Your Local Home Expo
Spring is nearly here and it's time to start your annual home improvement wish list. I love this time of year it inspires me to look at my home and property and look for opportunities to freshen things up, and make some changes!
There is no better place to become inspired than at your local Home Expo! These home and garden shows are a great way for area homeowners to meet local contractors, interior design experts, and lawn and landscape companies. As well as learn about the newest trends for home improvement, and how to make those ideas a reality in your own home. Finally, these shows are entertaining, the companies and vendors who attend often put together unique interactive displays that are just fun to see and learn from.
The local home show can help you in selecting a great contractor. Finding the right company to take on your project is like choosing a doctor, this is someone you need to be able to trust to work in your best interests. Local home expo's are often times supported by your communities home builders association, so you can be rest assured that the contractors that you are meeting are quality, licensed contractors that you can trust.
A few tips to make the most of your Home Expo visit:
1.) If you have a specific project in mind, bring some pictures or references for vendors so that everyone is on the same page
2.) Be open minded to the suggestions of the vendors, they are the experts!
3.) Be aware that many vendors may not provide pricing at the show but prefer to look first hand at the space and measure anything needed prior to giving any final price quotes for projects.
4.) The home expo is a busy place and you may have to wait to speak the representative, be prepared for short waits, the vendors try very hard to get to everyone.
5.) Be prepared to walk, Home Expo's are often held in large expo or convention centers that require a lot of walking.
6.) Have your calendar ready so you can schedule time for contractors to come out to prepare estimates if you have serious interest in getting your project started.
Now that you're fully prepared; come join us and the Jackson MI Home and Lifestyle Show, March 22-24 at the American One Fair Events Center! We'd love to discuss your ideas, and inspire you this spring!
Andy and Courtney Bailey
Greener Solutions Lawn And Landscape
There is no better place to become inspired than at your local Home Expo! These home and garden shows are a great way for area homeowners to meet local contractors, interior design experts, and lawn and landscape companies. As well as learn about the newest trends for home improvement, and how to make those ideas a reality in your own home. Finally, these shows are entertaining, the companies and vendors who attend often put together unique interactive displays that are just fun to see and learn from.
The local home show can help you in selecting a great contractor. Finding the right company to take on your project is like choosing a doctor, this is someone you need to be able to trust to work in your best interests. Local home expo's are often times supported by your communities home builders association, so you can be rest assured that the contractors that you are meeting are quality, licensed contractors that you can trust.
A few tips to make the most of your Home Expo visit:
1.) If you have a specific project in mind, bring some pictures or references for vendors so that everyone is on the same page
2.) Be open minded to the suggestions of the vendors, they are the experts!
3.) Be aware that many vendors may not provide pricing at the show but prefer to look first hand at the space and measure anything needed prior to giving any final price quotes for projects.
4.) The home expo is a busy place and you may have to wait to speak the representative, be prepared for short waits, the vendors try very hard to get to everyone.
5.) Be prepared to walk, Home Expo's are often held in large expo or convention centers that require a lot of walking.
6.) Have your calendar ready so you can schedule time for contractors to come out to prepare estimates if you have serious interest in getting your project started.
Now that you're fully prepared; come join us and the Jackson MI Home and Lifestyle Show, March 22-24 at the American One Fair Events Center! We'd love to discuss your ideas, and inspire you this spring!
Andy and Courtney Bailey
Greener Solutions Lawn And Landscape
Thursday, March 7, 2013
Tips For Starting Tomato Plants From Seeds
Tomatoes can be a temperamental plant, and especially when started from seeds. Generally the best time to start you tomatoes from seeds is 6-8 weeks prior to planting. Do Not transplant to outdoor beds until after the last early spring frost, or you'll lose your plants and your hard work.
Tomato seeds should be sown in fertile planting soil, 1/4 inch deep and approximately 0.5 inches apart from one another. If your using the biodegradable newspaper planters from our previous post then sow only 2-3 seeds per container. Allow seeds to germinate in damp soil until stems begin to show and then make sure that you move your plants to a sunny place or under florescent bulbs. Tomatoes require a lot of full sunlight to grow strong.
After about 15 days you should begin to see the early baby leaves of the plant open. They should be bright green, if yellow or pale, get more light and water slightly less (but don't allow the soil to dry out completely). These early leaves are called the cotyledons, an additional 15 days of growth and you will begin to see the first true tomato plant leaves growing above these tiny first leaves. Once true leaves are present you can thin your plants to 1-2 per growing container as needed. Keep in a warm sunny place, and make sure to water regularly.
Once temperatures have reached a consistent (day and night temperature) of at least 55 degrees, then you can transplant your tomatoes into the outdoor garden bed.
When transplanting your tomato plants, be sure to remove the cotyledon leaves and plant low in the ground bringing the soil up to the first true leaves. Tomatoes can grow roots from their stems, by burying deep in the garden early, you'll develop a much stronger root and stem system for your plant. Water thoroughly immediately after transplanting, and set up your tomato supports.
There are many types of tomato cages that you can choose from. They are very important to the health of your plant and the condition of the fruit. Tomatoes that are not properly supported can have stem breakage, and fruits resting on the ground will develop soft spots (bruises) and over ripen much faster. Follow manufacturer suggestions/ instructions when erecting your tomato cages.
Continue to follow our blog or website for more information about getting you garden growing!
Tomato seeds should be sown in fertile planting soil, 1/4 inch deep and approximately 0.5 inches apart from one another. If your using the biodegradable newspaper planters from our previous post then sow only 2-3 seeds per container. Allow seeds to germinate in damp soil until stems begin to show and then make sure that you move your plants to a sunny place or under florescent bulbs. Tomatoes require a lot of full sunlight to grow strong.
After about 15 days you should begin to see the early baby leaves of the plant open. They should be bright green, if yellow or pale, get more light and water slightly less (but don't allow the soil to dry out completely). These early leaves are called the cotyledons, an additional 15 days of growth and you will begin to see the first true tomato plant leaves growing above these tiny first leaves. Once true leaves are present you can thin your plants to 1-2 per growing container as needed. Keep in a warm sunny place, and make sure to water regularly.
Once temperatures have reached a consistent (day and night temperature) of at least 55 degrees, then you can transplant your tomatoes into the outdoor garden bed.
When transplanting your tomato plants, be sure to remove the cotyledon leaves and plant low in the ground bringing the soil up to the first true leaves. Tomatoes can grow roots from their stems, by burying deep in the garden early, you'll develop a much stronger root and stem system for your plant. Water thoroughly immediately after transplanting, and set up your tomato supports.
There are many types of tomato cages that you can choose from. They are very important to the health of your plant and the condition of the fruit. Tomatoes that are not properly supported can have stem breakage, and fruits resting on the ground will develop soft spots (bruises) and over ripen much faster. Follow manufacturer suggestions/ instructions when erecting your tomato cages.
Andy and Courtney Bailey
Greener Solutions Lawn and Landscape
www.greenersolutionslawn.com
ww.greenersolutionslawn.blogspot.com
Subscribe to:
Posts (Atom)